Most scary Halloween nail ideas leave you with the same problem: a ton of pictures and no real help figuring out what you actually want your nails to say. A black manicure can feel vampiric, witchy, haunted, elegant, or simply dark. Mix in the wrong symbols, finish, or color balance and a look that was meant to feel unsettling can turn into generic Halloween decoration fast.
So let’s make this easier. Start with the horror mood you want, figure out what actually makes that mood readable, then choose the easiest realistic way to get there. You do not need professional nail-art skills, a movie-character portrait, or ten different symbols fighting for attention on every finger. You just need a clear story.
What Makes Halloween Nails Actually Read as Horror?
Here’s the thing: horror is not just a color swatch. Black and red can look dangerous, but they can just as easily feel glamorous, festive, punk, or romantic. What makes the nails actually read as horror is how all those choices work together.
- Palette sets the mood first. Oxblood and black can feel predatory and elegant; bone white and smoke grey lean spectral; bruised purple and dirty ivory can make things feel decayed or just a little wrong.
- Symbols tell us what kind of horror we are looking at. Fangs, moons, bare branches, scratches, stitches, eyes, webs, fog and blade-like metallic lines all tell very different stories.
- Finish can completely change the feeling. Wet gloss can make red look freshly spilled; matte black feels more severe or funereal; chrome can suddenly read like a blade, a mirror or cold supernatural light.
- Contrast is where the intensity really kicks in. One sharp red mark against black can feel much more violent than five crowded novelty icons.
- And restraint matters more than people think. Repeating one strong idea usually works better than giving every nail a completely different Halloween symbol.
Think of those five things as your little horror decoder. Instead of asking, “Does this have a ghost or a spider on it?”, ask what the color, texture, symbols and empty space are telling you at first glance. That is usually the difference between nails that simply say Halloween and nails that actually make you feel something.
Scary Halloween Nail Ideas by Horror Style
Before you buy anything or save another reference image, pick the horror mood first. Then decide how far you want to take it: subtle, clearly spooky, or full theatrical horror. Doing that first makes it much easier to stop the set from turning into a pile of unrelated Halloween symbols.
| Horror style | Core signals | Intensity range | Lowest-friction route |
|---|---|---|---|
| Vampire & Gothic | Oxblood, black, lace, fangs, silver, sharp elegance | Subtle dark romance -> predatory glamour | Press-ons or a dark base plus one controlled accent |
| Witchy & Occult-Inspired | Moons, stars, eyes, snakes, botanicals, antique metallics | Subtle symbolism -> dramatic occult styling | Celestial decals/stickers over a simple base |
| Ghostly & Haunted | Smoke, bone white, fog, branches, cracks, shadow, windows | Barely-there eerie -> full haunted scene | Atmospheric design or restrained decals |
| Slasher, Blood & Grotesque | Blood red, black, scratches, drips, stitches, blade-like metallics | One disturbing accent -> theatrical gore suggestion | Focused accents or a pre-designed composition |
If you’re building the whole Halloween mood around one kind of fear, don’t stop at the nails. Our Halloween Movie Night Ideas guide can help you carry that same vibe into the rest of the night.
Vampire & Gothic Halloween Nails
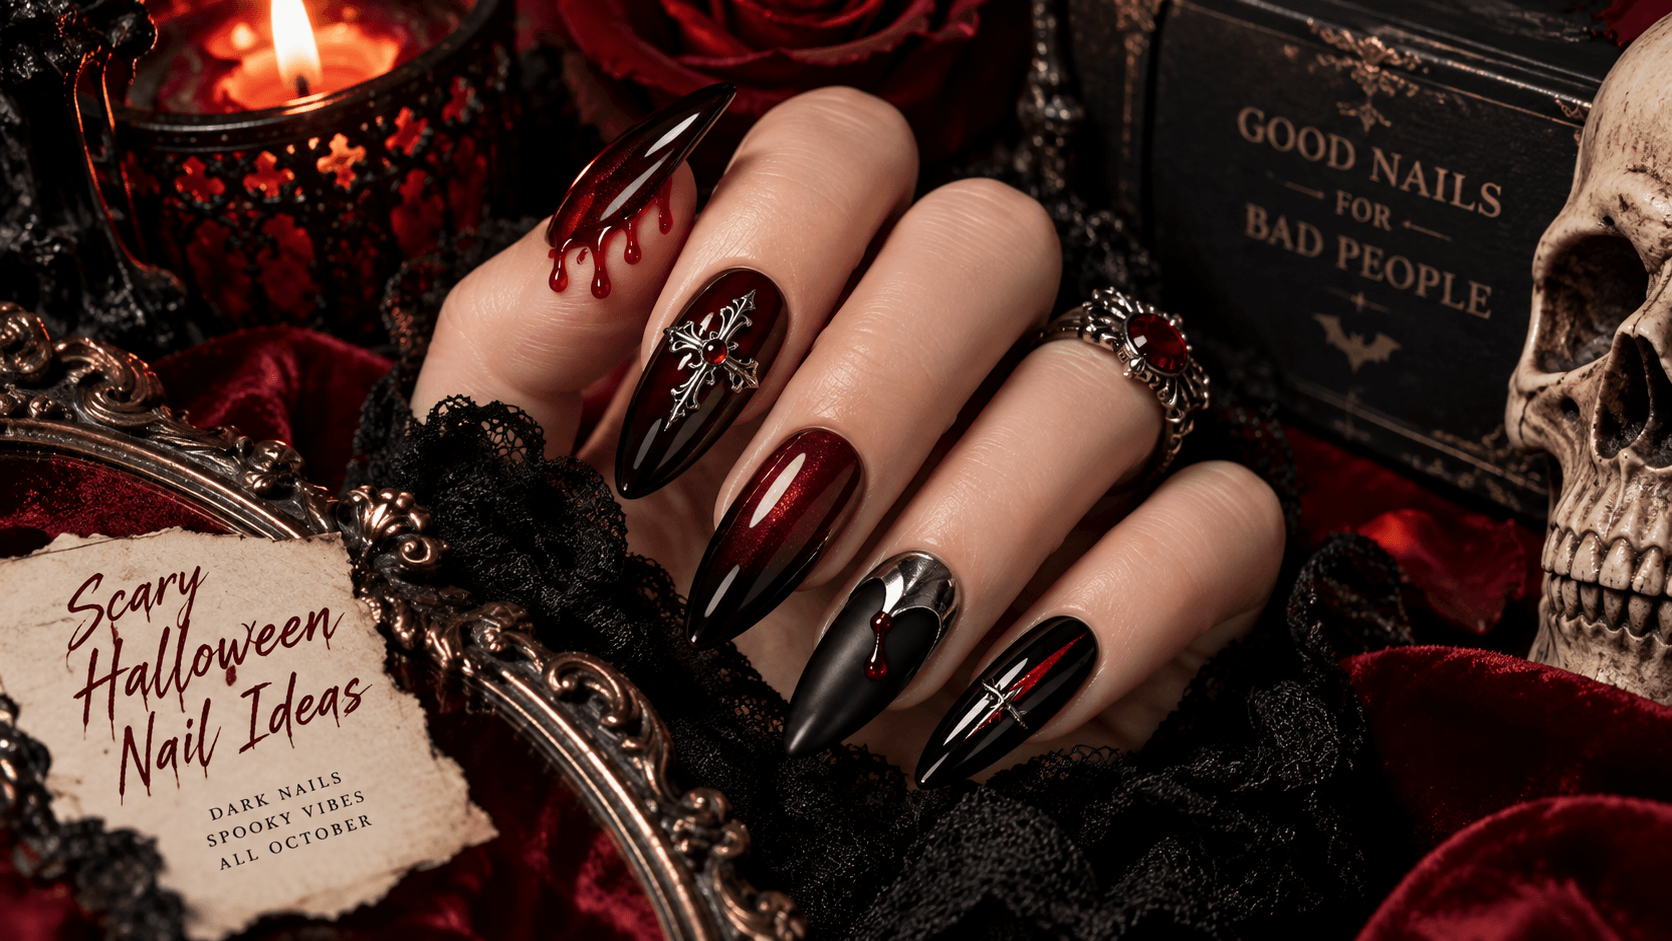
Vampire and gothic nails look best when they feel deliberate, elegant, and just a little dangerous. The trick is not simply throwing red and black together. Think black cherry, oxblood, ink black and tarnished silver, with the occasional pale bone or nude detail to break things up. Lace, fangs, thorn-like lines, gothic crosses or one tiny drop of red can all work — just make sure they are telling the same story.
Black-Cherry Bite. If you want something vampiric without going full fake-blood Halloween, start with black cherry or oxblood and let one narrow silver point or tiny fang-like accent break it up. The deep red gives you the blood reference without making it too literal, while that sharp metallic detail adds just enough danger. Keep the rest dark and simple. A finished press-on composition is the easiest route if you want the colors and accents already coordinated.
Funeral Lace. This is the quieter gothic option. Pair matte or ink black with one lace-like detail, a bone-nude accent and a little tarnished silver. It feels gothic because the mourning textures and antique-metal contrast are doing the work — not pumpkins or cartoon coffins. If the lace is too fiddly to paint, a decal or salon reference can handle that detail while the palette carries most of the mood.
How to Keep Vampire & Gothic Nails Elegant, Not Costume-Like
If you want the set to feel more vampiric than purely gothic, make red the disturbance rather than the base: one glossy oxblood drop, one bite-like mark, or one red accent against mostly black. That small imbalance creates threat without losing the elegance that separates this family from slasher gore.
Trend note. Pinterest’s 2026 Vamp Romantic forecast listed “gothic coffin nails” among its rising searches, reporting 180% growth in the comparison period behind the forecast. The term coffin nails refers to a tapered nail shape with a squared-off tip; it does not simply mean nails decorated with coffin imagery.
Pinterest Predicts 2026 trend report
For a quieter version, let one detail carry the story: a narrow silver line, a lace accent, or one glossy red nail against a mostly matte set. For full horror, push the black-to-blood-red contrast or use a sharper silhouette. Once bright orange pumpkins, cheerful ghosts and unrelated neon icons enter the same set, the vampire story disappears.
Affiliate disclosure: As an Amazon Associate I earn from qualifying purchases. Using these affiliate links does not add any extra cost to your purchase.
If you want the Black-Cherry Bite look without painting the design yourself, this MISUD red-and-black vampire/gothic press-on set on Amazon.com gives you a ready-made version of that visual direction.
Witchy & Occult-Inspired Nails
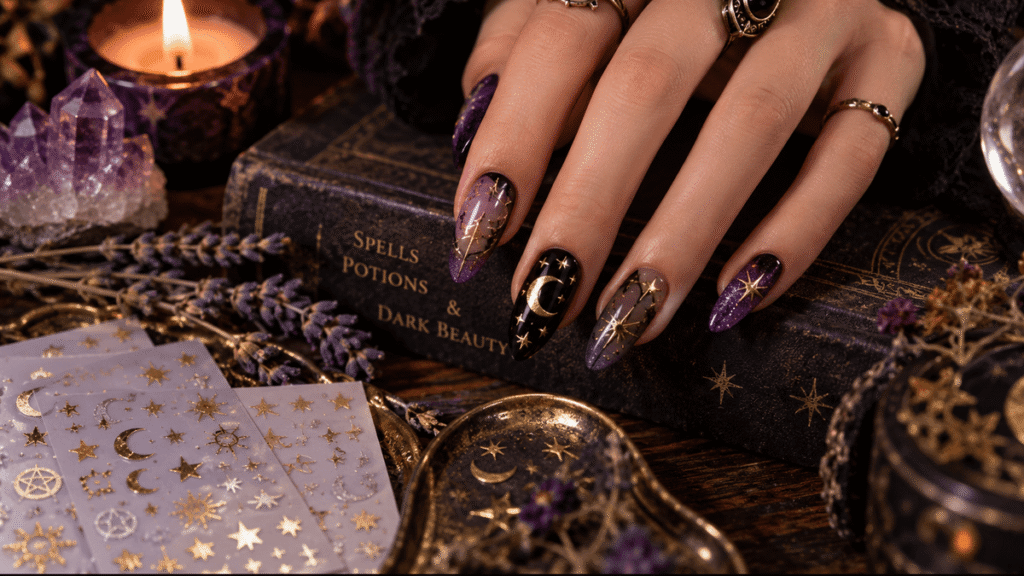
Witchy nails get much better the moment you stop trying to fit every mystical symbol onto one hand. Black, midnight blue, moss green, smoky purple, bone white and tarnished gold or silver all work beautifully because they feel nocturnal and a little old-world rather than party-bright. Moons, stars, eyes, snakes, candles, botanicals and fine geometric marks can do the rest.
Midnight Constellation. If you love the celestial look, start with black, midnight blue or deep plum and add just a few silver or antique-gold moons and stars. Keep the metallic details fine and leave a couple of nails almost empty. That breathing room is what makes it feel like a night sky instead of a Halloween sticker sheet. Self-adhesive celestial decals are the simplest route if you do not want to paint those tiny details by hand.
Serpent Moon. Use a smoky nude, muted green or black base with one serpent line and a crescent or small eye accent. The curved snake against one quiet symbol creates a controlled, talisman-like composition without needing a crowded set. If the serpent detail is too intricate to paint, use a focused decal or take the combination as a salon reference.
How to Keep Witchy Nails Cohesive, Not Crowded
Finish can change how this family reads. A soft matte or smoky surface feels older and more mysterious, while a thin metallic line creates a sharper celestial effect. Bright glitter can still work, but once it becomes the dominant feature the set starts to read festive rather than uncanny.
For a subtle version, repeat one symbol and let empty space keep it readable. For a more dramatic version, increase metallic contrast or add another related celestial element, but keep the family coherent. Pumpkins, dripping blood, smiley ghosts and candy colors pull the set back toward generic Halloween.
For Midnight Constellation, Namrec’s moon-and-star nail decals on Amazon.com offer an easier route to the celestial details without freehand painting.
Ghostly & Haunted Nails
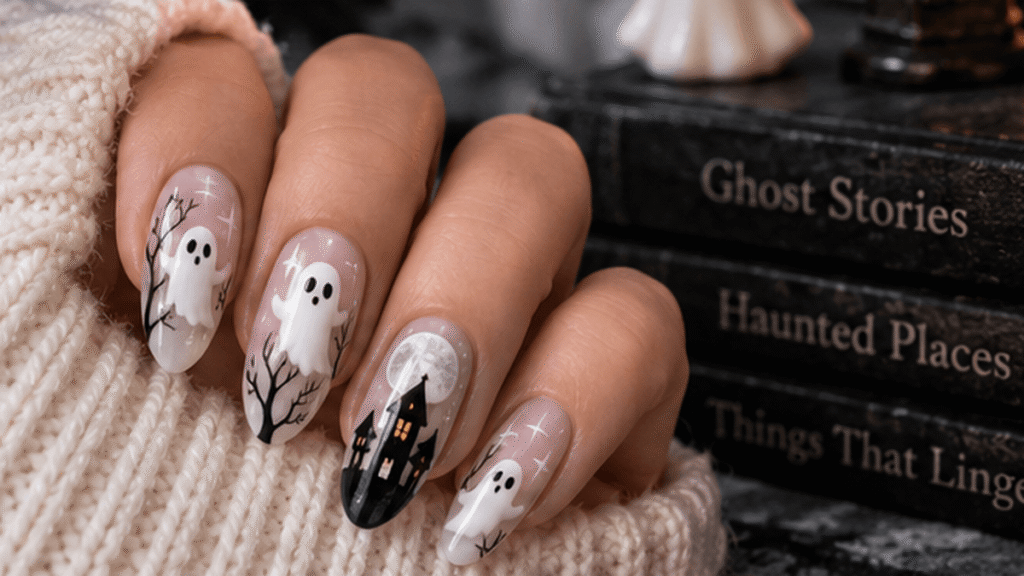
Ghostly nails are one of those looks where less really is more. A smiling white ghost can be cute — and there is nothing wrong with cute — but if you want the nails to feel genuinely haunted, uncertainty does much more of the work. Think shapes half-seen through fog, bare branches, dirty whites, empty windows, cracks, shadows and areas that look deliberately unfinished.
Fogged Window. Think cloudy glass first: milky white, smoke grey and a washed-out translucent effect, then one thin crack, window line or barely visible shadow. The reason it feels haunted is that you cannot quite tell what is on the other side. If painting a tiny atmospheric scene sounds like a nightmare in itself, a ready-made pattern or salon reference is the easier route.
Branches at Dusk. Use a washed blue-grey or bruised purple base with one black bare-branch silhouette and at least one quiet nail. The empty space matters: it makes the branch feel isolated rather than decorative. The scene suggests an abandoned landscape without needing a literal ghost face. A branch decal can work if the base remains faded and restrained.
To keep ghostly nails eerie rather than cute, soften the edges and lower the contrast before adding more symbols. A blurred pale shape can feel more unsettling than a detailed cartoon ghost because the viewer has to complete the image. The uncertainty is part of the effect.
The palette can stay cool and worn: smoke grey, bone white, washed blue-grey, dirty ivory, charcoal and black. Sheer-looking sections suggest mist; matte areas can feel dusty or abandoned. For full horror, repeat windows, branches, grave silhouettes or distressed textures across the set, but do not turn every nail into a separate illustration.
Slasher, Blood & Grotesque Horror Nails
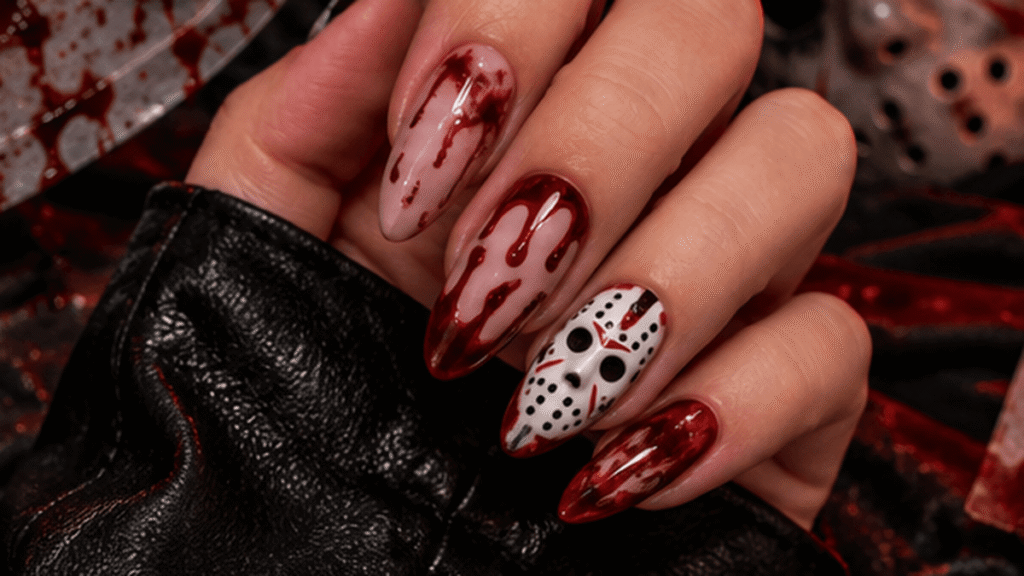
Slasher nails can handle more drama than the other families, but they still work best when the violence looks intentional. Think of a clean surface suddenly interrupted by red, a metallic line that feels like a blade, a scratch that breaks the symmetry, or stitches that suggest damage. Blood red, black, bone, dirty beige and bruised purple all fit, but where you place them matters more than how many colors you use.
Single Blood Line. Use a pale nude or bone base and confine glossy dark red to one controlled drip or narrow trail on one or two nails. The clean surrounding space makes the red feel like a sudden event rather than decoration. A focused decal or pre-designed accent is easier than covering the whole set in gore.
Chrome Wound. Start with matte black or a bruised neutral and add one blade-like chrome slash, then echo it with a single stitch or distorted organic line. Cold metal against a muted surface suggests injury and body-horror tension without copying a monster. If you want that chrome line to look really precise, take the idea to a nail professional rather than trying to freehand it.
The easiest way to lose the slasher effect is to make every nail equally loud. Give the eye somewhere calm to land. One clean nail beside a violent red mark or a chrome cut makes the interruption feel intentional, while five competing gore effects can flatten the tension into novelty.
If you want to push this one further, add asymmetry, scratched texture, eyes, teeth or controlled organic marbling. Body horror usually works better here when you keep it a little abstract. You really do not need Ghostface, Chucky, Michael Myers, Pennywise, Freddy Krueger or any other licensed character to make the set feel cinematic. Blood, blade-like metallics, stitches, cracks, teeth and distorted texture can tell that story perfectly well on their own.
Choose the Easiest Way to Get the Look
Once you know the mood, choose the execution route that asks the least from you. There is no universal winner because the right route depends on whether the look relies on a full composition, a few precise symbols, or a reference for a professional.
Ready-made press-ons
Press-ons make the most sense when the whole look depends on several details working together — maybe a black-and-silver gothic composition, a gradient, repeated branches or a complete scene. Look at the finished design and ask whether the colors and details are actually telling the story you want. For sizing, application and removal, check the individual listing rather than assuming every set works the same way.
Decals and stickers
Decals are great when you already like your base color and just need a few precise symbols to finish the look. Moons, stars, snakes, webs, tiny ghosts, stitches and fine gothic details all suit this route. If you buy a multi-sheet pack, treat it like a little library — pick two or three related designs instead of feeling like you have to use everything.
Wraps and full-surface strips
Non-gel full-surface wraps can make sense when the pattern itself is the point and you do not want to paint it freehand. They are less necessary when one decal can create the same effect. For more technical gel or cured systems, rely on the product instructions and specialist guidance rather than treating them as a simple visual shortcut.
Salon-reference route
For a more complex design, take the idea to a nail professional as a reference: give them the palette, two or three symbols, the finish, the intensity, and what you do not want. That is often the cleanest route for detailed lace, layered fog, fine linework or precise chrome geometry.
Safety note: Follow product labels, warnings and manufacturer directions. The FDA advises consumers to use nail products according to labeled directions and notes that irritation or allergic reactions can occur with some products. The American Academy of Dermatology notes that artificial nails can be hard on natural nails. FDA nail-care guidance | AAD artificial-nail guidance
Quick Questions About Scary Halloween Nail Ideas
Can scary Halloween nails work on short nails?
Yes. With short nails, simpler usually works better: one symbol, a controlled palette and enough empty space to keep the design readable. A tiny fang, crack, eye, branch or blood accent can communicate more clearly than a crowded scene.
How do I make Halloween nails subtle but still creepy?
Reduce the number of symbols, not the horror logic. Keep the palette dark or faded, use one unsettling accent, and let finish and contrast do some of the work. A black-cherry manicure with one silver slash can feel more threatening than a full set of novelty icons.
Which horror styles work beyond Halloween?
Vampire/gothic, dark romantic and witchy looks are the most evergreen because they overlap with alternative fashion rather than depending on pumpkins or October-specific imagery. Ghostly greys and distressed textures can also work year-round if the design stays abstract.
What is the easiest route if I cannot paint nail art?
Choose a finished press-on design when the whole composition matters, or use a simple base plus a few self-adhesive decals when only the symbol matters. If the concept depends on detailed linework or layered effects, take the reference to a nail professional.
Do horror nails need movie characters to work?
No. Horror is communicated long before a character appears. Blood, fangs, fog, branches, lace, eyes, stitches, cracks, bone tones and blade-like metallic accents can create a clear horror story without copying a franchise design.
If you take one thing from this guide, let it be this: the strongest scary Halloween nail ideas start with a mood, not a shopping cart. Decide what kind of fear, darkness or atmosphere you want the manicure to carry, then choose only the colors, symbols and finish that support that story. Once you know the mood, the rest gets much easier — maybe it is a press-on set, a few decals, a wrap, or simply a reference image you take to a nail professional. You do not need more stuff. You just need the pieces that actually fit the look.
To carry the same horror mood into the rest of your look, our scary Halloween costume ideas guide uses the same fear-first approach to build the costume around one strong visual anchor.